| The Syllabus | The Notes |
The Notes
Here’s where you’ll find resources, code, links, and notes for every class. Materials are added here generally at least one day before each class, but can change and get updated up until class time.
Class 1 • Basic internetting
Introductions
- A bit about me
- Personal website
- CNN
- Twitter: @jkeefe
- Email: john.keefe (at) journalism.cuny.edu
- Slack is better! Here’s our Slack.
- A bit about you
- Name
- Where you’re from
- What’s your Social J area of interest?
Engagement Projects in Journalism
- Overview of engagement projects in journalism
- KPCC/LAist Coronavirus Answers
- ProPublica’s Get Involved page
- First Draft SMS course
- Electionland Bot … pick a method:
- Text VOTE, VOTA (for Spanish), or 投票 (for Chinese) to 81380
- Message us at 1 850 909-8683 on WhatsApp
- or visit Electionland on Facebook Messenger
What’s a Prototype (for us)?
- Something you can try
- (Also something you MAKE, which is fun)
- Maybe just one
- Not polished
- Not at scale
- Probably not secure
- But TRY-worthy
- Something you can share
Quick Examples
- SMS bot: Text “hi” to
(646) 699-3322 - Better Weather
Logistics & plan
- Go through the Syllabus.
- Everyone in the Slack! Join here and use your school email address. Join channel #design-development.
Exploring web pages
- Sign up for Glitch
- Make a new project >
glitch-hello-webpage- Data journalism classes: Started from scratch & uploaded to Github
- Glitch: Start from something that already works
- Basic layout of the page
- Name button
- Change the theme if you’d like
- The files
- A file
- The result (which has its own URL … which I’ll call the “live site” url)
- The share button
- Name button
- Go through
index.html - Note the other files
- Back to
README.md - Click on the link where it says:
Want a minimal version of this project to build your own website? Check out Blank Website! - Much closer to blank! Just the essentials.
- Take a close look at all the files. Make sure you understand what’s happening here.
- Remember that the public url first looks at
index.html
Assignment
This is the “Class 1” assignment. Do it now … it’s due on at high noon before Class 2.
Continue to play with this project in Glitch and make it your own. Change colors, play with formatting, play with the text. Get creative! Google around for html tips and tricks if you want. Post the live link to your project in Slack in #design-development so we can all try it.
Class 2 • Introduction to databases
Quick review of last week
- Some submissions
- Fixes
Note on “assets”
- This is where we can put images and other things
- Add an image to the assets
- Use the full url to add it to
index.htmlusing<img src = "[URL OF IMAGE]" > - (note image tag is one of the few in html without a closing tag. so no
</img>.
A different structure
“Static”
What we did last week:
- Request: You -> https://curious-scout.glitch.me -> Glitch
- Response: Glitch ->
index.html-> you
“Dynamic”
- Request: You -> https://newmark-bark.glitch.me -> Glitch
- Response: Glitch ->
server.js->index.html-> you
Instead of Glitch just serving up your fixed or static html page (as in Class 1) you’re using a “server” file that serves up the page.
- Search for
jkeefeor go to https://glitch.com/@jkeefe - Find
newmark-bark - Remix it!
- Name it
[yourname]-bark
Let’s take a look around …
See how the main page, index.html, is served.
We can also make a new “about” page by adding a new view page and a new route.
Here’s the view page, which we’ll call views/about.html:
<html>

  <head>
    <title>About Us</title>
  </head>

  <body>

    <h1>
      About Newmark Bark
    </h1>

    <p>
      Newmark Bark is a service of the Newmark Graduate School of Journalism at CUNY.
   </p>

  </body>

</html>
Here’s the route, which goes in the server.js file under the line that says put the routes under this line!
// this is the "home" page or the regular url

app.get('/about', function(request, response) {
  response.sendFile(__dirname + '/views/about.html');
});
(can also add the stylesheet to the about.html page by putting this code inside the <head> tags):
<!-- import the webpage's stylesheet -->
<link rel="stylesheet" href="/style.css">
Why all the hassle?
Here’s why … with a “dynamic” page, we can alter the page before sending it back to the user.
For example, try visiting: https://newmark-bark.glitch.me/random (note the “random” at the end!)
- Request: You -> https://newmark-bark.glitch.me/random -> Glitch
- Response: Glitch ->
server.js-> get data -> inject data ->fact-page.html-> you
We can inject the page with data before serving it up.
But what if you have more than 6 rows of data?
Databases!
We’re going to play with a database that’s already up an running online.
- Go to: https://datasette.johnkeefe.net/
- Click on “nyc_dog_licenses” (It’s below “fundata”)
- Take a look around! 👀
- Be sure you understand the data, what’s here, what’s not
- Click on “view and edit SQL”
- Clear out the box that’s there. We’re going to start from scratch.
A little bit of SQL
SQL stands for “Sequel Query Language” and is a very powerful, if arcane, way to ask questions of a database.
The format is generally:
- SELECT [the columns you want to see] FROM [a table]
- … with additional filters such as WHERE and GROUP BY and ORDER BY
SELECT
- Try
SELECT * FROM nyc_dog_licenses;and click “Run SQL” (note the;at the end of a SQL command is often required, though we don’t need it on this website) - Try
SELECT * FROM nyc_dog_licenses LIMIT 10; - Try
SELECT AnimalName, BreedName FROM nyc_dog_licenses LIMIT 10;
count() & WHERE
- Try
SELECT count() FROM nyc_dog_licenses; - Try
SELECT count() FROM nyc_dog_licenses WHERE AnimalName = "BELLA"; - Try
SELECT count() FROM nyc_dog_licenses WHERE AnimalName = "Bella"; - Try
SELECT count() FROM nyc_dog_licenses WHERE AnimalName LIKE "bella";
GROUP BY & ORDER BY
- Try
SELECT AnimalName, count(AnimalName) FROM nyc_dog_licenses GROUP BY AnimalName; - Try
SELECT AnimalName, count(AnimalName) FROM nyc_dog_licenses GROUP BY AnimalName ORDER BY count(AnimalName); - Try
SELECT AnimalName, count(AnimalName) FROM nyc_dog_licenses GROUP BY AnimalName ORDER BY count(AnimalName) DESC; - Try
SELECT AnimalName, count(AnimalName) FROM nyc_dog_licenses GROUP BY AnimalName ORDER BY count(AnimalName) DESC LIMIT 10;
AS
- Try
SELECT AnimalName, count(AnimalName) AS TotalDogs FROM nyc_dog_licenses GROUP BY AnimalName ORDER BY TotalDogs DESC;
Break!
Load the database into your Glitch project
- In your bark project, go to the Glitch terminal
- Tools > Terminal
- Type:
cd .datato change directory to the.datadirectory - Copy-paste this and hit return:
wget "http://s3.amazonaws.com/media.johnkeefe.net/data/NYC_Dog_Licensing_Dataset_2018.csv" sqlite3 my.db '.mode csv' '.import NYC_Dog_Licensing_Dataset_2018.csv nyc_dog_licenses' - Type:
sqlite3 my.dbto start the database - Type:
SELECT count() FROM nyc_dog_licenses;to test it! - Can even do:
SELECT AnimalName, count(AnimalName) FROM nyc_dog_licenses GROUP BY AnimalName ORDER BY count(AnimalName) DESC LIMIT 10; - Type:
.exitto exit - Close the Terminal with the “X” at the right
Dynamic with a database
- Request: You -> https://newmark-bark.glitch.me/first10 -> Glitch
- Response: Glitch ->
server.js-> query a database -> get the answer -> turn into JSON -> you
Let’a make it!
First …
- In Glitch go to the
server.jsfile - Uncomment the SQLite code.
- That means delete the
//from the beginning of the lines - (But not all of those on the first one, which is just a label)
- A shortcut: highlight the lines and press
[command] /`
- That means delete the
We’ll talk about adding this code in class:
Block one
// watch for "first10" in the URL
app.get('/first10', (request, response) => {

    // set the query
    let query = 'SELECT * FROM nyc_dog_licenses LIMIT 10'

    // run the query
    db.all(query, (err, rows) => {

        // let us know if something went wrong
        if (err) {
          console.log(err)
        }

        // otherwise, send a "response" with a JSON version of the rows we got
        response.send(JSON.stringify(rows))
  })

})
We’re seeing data on the web
- A little bit about JSON
- To make your life easier, download JSONview plug in
Block two
// watch for "toppnames" in the URL
app.get('/topnames', (request,response) => {

    // set the query
    let query = 'SELECT AnimalName, count(AnimalName) as TotalDogs FROM nyc_dog_licenses GROUP BY AnimalName ORDER BY TotalDogs DESC LIMIT 10'

    // let us know if something went wrong
    db.all(query, (err, rows) => {

        // let us know if something went wrong
        if (err) {
          console.log(err)
        }

        // otherwise, send a "response" with a JSON version of the rows we got
        response.send(JSON.stringify(rows))

    })
})
Assignment
This is the “Class 2” assignment. Do it now … it’s due on at high noon before Class 3.
Add a new “route” to your web service called “topbreeds” that, when hit by a web browser, returns a list of the top FIVE dog breeds (by count) in the database.
Submit that “topbreeds” live link in the Google Classroom assignment form. That link will look like https://https://newmark-bark.glitch.me/topbreeds … but with your name instead of newmark.
Remember that your can find your base “live link” by clicking the “Share” button.
Class 3 • Making a dynamic webpage
Reset from last week
- Be sure to submit your attendance report
- Code live vs. video
- “topbreeds”
- Any troubles?
Data for the web
We’ve been making what’s known as an API. Officially, API stand for Application Program Interface. But I like to think of it as Another Person’s Information. It’s a way to get information from data on the web … even though you usually don’t actually see it. It’s often happening in the background.
-
The Weather Weather.gov -
How to vote in your state Washington Post -
Nursing home inspect ProPublica -
The NYPD files ProPublica -
Tracking Covid at US Colleges New York Times
Let’s make an a service specifically for providing data on how many dogs are named … whatever name we’re asked … and then make it easy to use.
- It will look like this when it’s done!
Code walk-through
Design & Development - 03 Walkthrough from John Keefe on Vimeo.
The code walk-through is embeded above and also posted on Vimeo so you can go at your own pace — pause, speed up, go back. (Note that, oddly, the speed controls are only available on the embedded version above; they don’t show up on the Vimeo site.)
Quick SQL review
Remember, we used SQL to query the database for information.
The syntax, again, is: SELECT [columns or pseudo-columns] FROM [table] ... [more options]
SELECT AnimalName, breed FROM dogs LIMIT 10;SELECT count() FROM dogs;SELECT count() FROM nyc_dog_licenses WHERE AnimalName LIKE "bella";SELECT AnimalName, count() as total FROM nyc_dog_licenses WHERE AnimalName LIKE "bella";
Also remember we can put these queries into our “server.js” file on Glitch.
Making a lookup form on our site
We’re going to provide a service to our audience by making it super easy for them to find out how many dogs are named like theirs.
Block 3
app.get('/name/max', function(request,response) {
  db.all(`SELECT AnimalName, count(AnimalName) AS total FROM nyc_dog_licenses WHERE AnimalName LIKE "max"`, function(err, rows) {

    if (err) {
      console.log(err)
    }

    response.send(JSON.stringify(rows))

  })
})
- note that we’re changing “max” to a variable called
:input… and then using that in the SQL query as${request.params.input}.
Block 3A
app.get('/name/:input', function(request,response) {
  db.all(`SELECT AnimalName, count(AnimalName) AS total FROM nyc_dog_licenses WHERE AnimalName LIKE "${request.params.input}"`, function(err, rows) {

    if (err) {
      console.log(err)
    }

    response.send(JSON.stringify(rows))

  })
})
Let’s build a lookup form!
- In the left-hand column, find
/viewsand click on the three little dots. - Pick “Add file to Folder”
- Call it
form.html - Click on that new file,
form.html - Into the big blank box in the middle of the screen, paste Block 4:
Block 4
<!DOCTYPE html>
<html>
<body>

    <form>
        What's your dog's name?<br>
        <input type="text" id="dog_box" onkeyup="hitAPI()"><br>
    </form>
    <div id="answer_line"></div>

    <script>
        function hitAPI() {

            var input_name = document.getElementById("dog_box").value
            var xhttp = new XMLHttpRequest()

            xhttp.onreadystatechange = function() {
                if (this.readyState == 4 && this.status == 200) {
                    data = JSON.parse(this.responseText)
                  document.getElementById("answer_line").innerHTML = `There are ${data[0].total} dogs named ${input_name} in NYC.`
                }
            }

            if (input_name != "") {
              xhttp.open("GET", `/name/${input_name}`, true)
              xhttp.send()
            } else {
              document.getElementById("answer_line").innerHTML = ""
            }

        }
    </script>
</body>
</html>
Now we need a route to our form.
Block 5
In your server.js file, add this route. For organization’s sake, put it right after the first route … the one that sends people to index.html.
app.get('/form', function(request, response) {
  response.sendFile(__dirname + '/views/form.html');
});
Assignment
This is the “Class 03” assignment. Do it now … it’s due on at high noon before Class 04.
Complete the steps above so that your form works and answers the question for any name I enter. Paste the Show URL into the form below and submit it by the deadline. The URL should be like name-bark.glitch.me/form.
If you get stuck try backing up and following my steps again. If you still can’t get it to work, you have options:
- Go to the
#design-developmentchannel in the social-j Slack and post the “edit” link to your code. That link will begin like this:https://glitch.com/edit/#!/your-project .... Include a short description of what’s not working and what you’ve already tried. - Join my “helpdesk hours” Wednesday at 12:30 pm. The link for that has been added to the syllabus and will be posted in the
#design-developmentchat every Wednesday morning.
Class 4 • Introduction to conversational interfaces
Automatically processing what someone is saying – either in a chat, to a voice assistant, or in an email – is increasingly possible thanks to machine learning. We’ll play with one of these natural language processing tools (such as Dialogflow) to get a handle on how to make it work for you.
Utterances
These are things humans might say or type to a bot.
- How much is a plane ticket to Miami?
- Where’s the nearest dog park?
- What’s the weather going to be like tomorrow?
- Yes, I agree.
- Nope.
- I’m in New York.
- Wow!
When building a bot, you need to have a sense of what kinds of things your users might ask — so it helps to declare up front what kinds of things it can answer!
Hi! I’m the Newmark Bark Bot and I can answer questions about dogs and dog ownership in New York City.
Utterances are used to train the bot, and in Dialogflow these called “Training Phrases.”
Intents
Intents are categories of questions we can answer, and usually track with some basic function the human is asking the bot to do. Many utterances can lead to the same intent:
- How much is a plane ticket to Miami?
- What does it cost to fly from New York to London?
- What’s the price of a plane trip from Chicago to Los Angeles?
What’s the intent here? We might say it’s air-travel-price.
But intents can be simpler than that, too.
- Yes!
- Yup.
- You bet!
- Si.
- Of course
… all mean “yes” to the bot. So we could group these into an intent called response-yes.
And these:
- No way
- Nope
- nada
- no
- Heck no
… all mean “no” to the bot. So we could group these into an intent called response-no.
And for our exclamations,
- Wow
- OMG
- whoa!
- I can’t believe it!
- Amazing
And words like these could mean the response-wow intent.
So you could make bot responses to those intents instead of those words, and let the Natural Language Processor decide which intent is, um, intended.
Entities
Consider our air-travel-price intent from above:
- How much is a plane ticket to Miami?
- What does it cost to fly from New York to London?
- What’s the price of a plane trip from Chicago to Los Angeles?
While the intent may be the same (“tell me the price of a plane trip”), the answers are definitely not going to be the same, right?
In order to formulate an answer, we’d need some information:
- Where are you flying from?
- Where are you flying to?
- When?
- What airline?
- What class of seat?
The portions of the intent you need to answer a specific question are called “entities” (and also “slots” and “elements” and probably many other things, sorry!)
Entities here would include “Miami,” “New York,” “Chicago,” and really any moderately sized city. They’d also include “Delta,” “American,” “JetBlue,” and really any airline. Also “September 18, 2020” and “8 pm” and any other date/time combination. These are all “Entities.”
Another example
Consider the following phrases:
- What’s the forecast in Minneapolis tomorrow?
- Will it rain in New York Friday?
- What’s the temperature outside?
- Do I need an umbrella?
You might call this a get-forecast intent. To answer a “forecast” intent, you need two additional pieces of information: Where and when. Entities!
So a get-forcast intent requires place and time.
-
What’s the forecast in Minneapolis tomorrow? Intent:
weather-forecastEntity Place:minneapolisEntity Time:tomorrow -
Will it rain in New York Friday? Intent:
weather-precipitationEntity Place:new yorkEntity Time:friday -
What’s the temperature outside? Intent: ? Entity Place: ? Entity Time: ?
-
Do I need an umbrella? Intent: ? Entity Place: ? Entity Time: ?
We can set up our bot so that if the entity is missing, the bot asks for it.
Contexts
Context is information about where we are (or, more often, where we just were) in the conversation. Context becomes important when the same response has different meanings in different parts of the conversation.
For example, “yes” means something different if the question is “Do you like cats?” instead of “Do you like dogs?”
I like to think of “Contexts” as breadcrumbs we can leave along the way to keep track of the conversation.
Training
To train a bot — really a machine-learning model — we do the following:
-
Set up an intent.
-
Come up with as many training phrases as possible to trigger that intent. The more the better! Usually you’ll want at least 10.
-
Write a response to that intent, which could be another question.
Interestingly, most natural language systems allow you to review its decisions and train it when it performed well and performed poorly.
Introduction to Dialogflow
There are lots of tools out there to use to make bots. We’ll play with Dialogflow.
Follow the instructions in this week’s coding walk-through video:
You can also see the video on the Vimeo site.
Setup
You’ll need to be logged into your J-School account or any Google/Gmail account.
- Go to Dialogflow
- Choose “Create Agent” – and you may need to authenticate with Google again here.
- Note that you can think of “Agents” as one bot brain. What you teach one agent isn’t (easily) shared with another agent.
- Name it “DogBot” (no spaces allowed)
- Leave the rest of the page as it is.
- Click “Save”
OK, your “agent” is established.
- If you don’t see a sidebar on the left side, click the menu icon (the three horizontal lines)
Building a dog bot
Elaboration for all of these steps is in this week’s walk-through video.
- Establish the welcome intent.
- “Hello! I’m here to help NYC dogs and their owners. You can play the pet quiz, find a dog run, or look up your dog’s name. What would you like to do?”
- Build the each intent.
- Come up with 5 phrases
- Include a response text
- Test them out
- Build the Pet Quiz
- What happens if you say something wrong?
- That’s the “Fallback intent” … let’s fix that.
- Share it with the world (and your instructor):
- Go to integrations
- Flip the switch on “Web demo”
- Copy the link to the bot
- NOTE! I forgot to mention this, but you can also get an EMBED code here to put the bot on your own site.
- Fill out the assignment form, including that URL
Assignment
Check out Google Classroom for the “04 Assignment.” You’ll need the URL from the end of the video. Do it now … it’s due on at high noon on the day of our next class.
If you get stuck try backing up and following my steps again. If you still can’t get it to work, you have options:
- Go to the
#design-developmentchannel and provide a short description of what’s not working and what you’ve already tried. - Join my “helpdesk hours” Wednesday at 12:30 pm. The link for that has been added to the syllabus and will be posted in the
#design-developmentchat every Wednesday morning.
Class 5 • Talk to me: Making a voice service for Google Home
Let’s make it!
Video walk-through
Design & Development: Class 5 Walk-through from John Keefe on Vimeo.
Update our Glitch app to get ready for requests from Dialogflow
- Log into Glitch
- We need to make a new route. It’s like the “form,” but it’s specific to Dialogflow, so we can accept Dialogflow’s request and make an answer. Here’s the code:
Block 6
app.post('/dialogflow', function(request, response){

  var search_dog = request.body.queryResult.queryText

  db.all(`SELECT AnimalName, count(AnimalName) AS total FROM nyc_dog_licenses WHERE AnimalName LIKE "${search_dog}" GROUP BY AnimalName`, function(err, rows) {

    if (err) {
      console.log(err)
    }

    var total_dogs

    if (rows.length < 1) {
      total_dogs = "no"
    }  else {
      total_dogs = rows[0].total
    }

    var response_phrase = `There are ${total_dogs} dogs named ${search_dog} in New York City.`

    var data ={
      "fulfillmentText": response_phrase
    }

    response.send(JSON.stringify(data))

  })

})
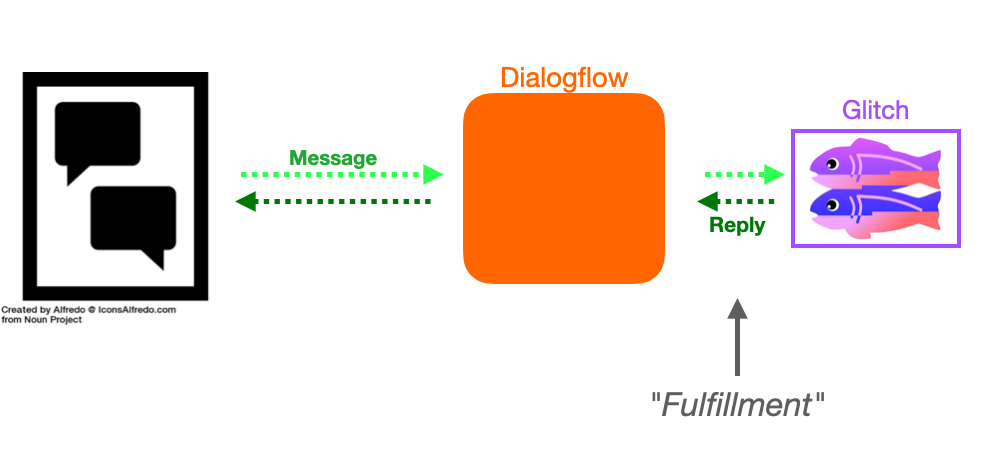
Tell Dialogflow where to get the answers
- Log into Dialogflow
- First we’re going to let Dialogflow that we’re going to use a “Fulfillment” service (our Glitch site!) to help answer questions. Click on the “Fulfillment” tab.
- Here, flip the webhook switch from “Disabled” to “Enabled” at the top so it’s blue.
- We need to provide our dog service’s URL. It’ll be in this format:
https://[your-project-name].glitch.me/dialogflow - Put that into the Dialogflow webhook “URL” line (don’t forget the
/dialogflowat the end!)
Set up the conversation
- Go to the “DogNameLookup” intent
- Change the output text to “Excellent! What’s your dog’s name?”
- Also need to add an Output Context! Let’s call it
asked-for-name - Need to make a new intent. But this is a fallback intent. That is, we’re not trying to detect what they say from the language. We want the answer, no matter what the human says. But we also don’t want to go to the default fallback intent . That’s why we set the output context. So if we’re waiting for a response to
asked-for-namewe’ll use this. There’s a special place to make these intents. - Let’s call it
CheckGlitchForName - Add an “Input Context”:
asked-for-name(give it a duration of 1) - Open the “Fulfillment” section (in the main part of the window)
- Turn on the switch for “Enable webhook call for this intent.”
- Give it a try in the test window.
- Give it a try in the web chat
- Once the DogNameLookup works on the web chat, submit this link (just like last week).
Do it with your voice!
Note! Your J-School Google account isn’t authorized to do this part of the project. In order to try this yourself, you’ll need to share your bot with another Gmail account.
To do that …
- click on the “gear” icon next to your Agent name (probably “DogBot”)
- click on “Share”
- Under the section “Invite new people” add your personal Gmail address.
- Change the type of person to “DEVELOPER”
- Click “ADD”
OK, now we’re ready to continue.
- In a new browser, log into your other Gmail address.
- Go to dialogflow.cloud.google.com
- Get into your DogBot
- Go to “Integrations”
- Pick Google Assistant integration (don’t pick the new offering … just the “continue to the integration” link)
- Click “TEST” at the bottom.
- Wait for it to get set up “Actions on Google” (takes a full minute or so)
- Allow location use
- Click on the microphone
- Allow microphone use
- Say “Talk to my test app”
- Answer the questions! (You have to click the microphone before you say something)
- Fun!
Class 6 • Getting & giving insights with Google forms and sheets
- Making a form in Google Forms
drive.google.com- Click “New +”
- Pick “Google Forms”
We’ll explore how to collect and see the data in Google Sheets.
- Also Airtable
- Also Typeform
Pulling data FROM a Google Sheet
To continue in the walkthrough, you should have the following tabs open in your browser:
- These notes
- Your Glitch app
- A new, blank spreadsheet
Code walkthrough video!
Note: If you don’t get the “scary warning” I talk about during the authorization process, then just ignore that part of the video and click “Allow.”
Design & Development 2021 • 06 from John Keefe on Vimeo.
Turning your spreadsheet into an API
- Start a new Google Sheet (Tip: You can do that quickly by typing the URL
sheets.newinto a browser) - Title the first column
headline - Title the second column
summary - Add three headlines and three summaries
- Note: Anything you type will become public! So no secrets, please.
OK, now we’re going to add some magic …
- In the menu, choose
Tools > Script Editor - This will open a new browser tab
- Name the project
sheet2json - Delete everything in the shaded box
- Paste into the shaded area code Block 7:
Block 7
function doGet(e) {

  var sheetName = "Sheet1";
  var sheetId   = "YOUR_SHEET_ID";

  var book = SpreadsheetApp.openById(sheetId);
  var sheet = book.getSheetByName(sheetName);

  var json = convertSheet2JsonText(sheet);

  return ContentService
          .createTextOutput(JSON.stringify(json))
          .setMimeType(ContentService.MimeType.JSON);
}

function convertSheet2JsonText(sheet) {
  // first line(title)
  var colStartIndex = 1;
  var rowNum = 1;
  var firstRange = sheet.getRange(1, 1, 1, sheet.getLastColumn());
  var firstRowValues = firstRange.getValues();
  var titleColumns = firstRowValues[0];

  // after the second line(data)
  var lastRow = sheet.getLastRow();
  var rowValues = [];
  for(var rowIndex=2; rowIndex<=lastRow; rowIndex++) {
    var colStartIndex = 1;
    var rowNum = 1;
    var range = sheet.getRange(rowIndex, colStartIndex, rowNum, sheet.getLastColumn());
    var values = range.getValues();
    rowValues.push(values[0]);
  }

  // create json
  var jsonArray = [];
  for(var i=0; i<rowValues.length; i++) {
    var line = rowValues[i];
    var json = new Object();
    for(var j=0; j<titleColumns.length; j++) {
      json[titleColumns[j]] = line[j];
    }
    jsonArray.push(json);
  }
  return jsonArray;
}
Before we move on, we need to put your google sheet’s ID in the code!
- Click over to the spreadsheet we were building
- Find the Google Sheet ID in the sheet’s URL. It’ll be a long string of characters between two
/, like1zPE0LQU2gQdrKaaD4mmm7oyW1JjSSqRbXA0Ypn_uGGx - Copy that
- Click back to the script-building tab and paste it in the code in place of
YOUR_SHEET_ID(but keep the quote marks).
OK, let’s get this running …
- Click the “Save” button (the floppy disk icon)
- Click the “Run” button
-
If you get an error about a function being deleted, just ignore it and click Run again
- If get a scary warning about code not being authored by Google, do this:
- Click “Review permissions”
- Choose your username
- You’re going to get a scary warning that Google hasn’t verified the app.
- Click the tiny “Advanced” link.
- Click the “Go to Sheet2Json(unsafe)” link
- Click “Allow”
- Click the “Deploy” button
- Pick “New Deployment”
- Click on the gear icon
- Pick “Web App”
- Add a description
- Change “Who has access” to
Anyone - Click “Deploy”
- Click on the “Web App” URL
There’s your spreadsheet in JSON format!
Add the “request” library to our project
First we have to add some software to our code. This is a pre-made “library” that allows your Glitch project to go get data from another web service — also known as making a request. That’s why the library we are going to use is called “request.”
- in the files list at the left, click on
package.json - at the top of the project, click “Add package”
- type “request”
-
chose that
- OK, now switch to the file
server.js - Make a little space after Line 9 near the top
- Add this in the space (like on Line 11):
const request = require('request');
All set!
Build a “dog news” page
- In Glitch make a new file in the
viewsfolder - Name it
news.html - Paste Block 8 into this file
Block 8
Make a route to the news page
OK, now we need to make our route.
- in the files list at the left, click
server.js - Open a little space aftr our last route (but above the
---- Add routes above this line ----line - We’re going to add a new “route” called
/news. Copy and paste Block 9 into this spot:
Block 9
app.get("/news", function(req, resp) {
  const url = "PUT_YOUR_GOOGLE_SCRIPT_URL_HERE";
  const options = { json: true };
  request(url, options, (error, res, body) => {
    if (error) {
      return console.log(error);
    }

    if (!error && res.statusCode == 200) {
      // do something with JSON, using the 'body' variable

      let data = { stories: body };

      // NOTE! If your page isn't updating, try increasing
      // this number by one. Just changing it makes the
      // news.html page refresh
      data.cachebust = 1;

      resp.render("news.html", data);
      console.log(data);
    }
  });
});
OK, in that code you just pasted, we need to change PUT_YOUR_GOOGLE_SCRIPT_URL_HERE to the JSON script for your spreadsheet. Go to that tab, copy the URL, and paste it over this PUT_YOUR_GOOGLE_SCRIPT_URL_HERE — making sure to keep the quote marks before and after.
Now try adding /news to your live URL!
Paste this full link into the Google Classroom assignment form to complete this week’s homework.
Assignment
Check out Google Classroom for the “06 Assignment.” You’ll need the URL from the end of the video. Do it now … it’s due on at high noon on the day of our next class.
If you get stuck try backing up and following my steps again. If you still can’t get it to work, you have options:
- Go to the
#design-developmentchannel and provide a short description of what’s not working and what you’ve already tried. - Join my “helpdesk hours” Wednesday at 12:30 pm. The link for that has been added to the syllabus and will be posted in the
#design-developmentchat every Wednesday morning.
Class 7 • Data security: For you, your sources, and your audience
Assignment
Check out Google Classroom for the “07 Assignment.” You need to do one of the security steps John described, submit it and also post it in the #design-development Slack channel.
Class 8 • Chatbots for collecting information in real time
- Open your glitch projet
- Click on the
server.jsfile - Look for the
/dialogflowroute - In that code, look for the line that says:
var search_dog = request.body.queryResult.queryText; - Make some blank lines after that line
- Copy-paste this code Block 8A into that space:
Block 8A
const data = Date() + "," + search_dog + "\n"

fs.appendFile("searches.csv", data, err => {
  if (err) {
    console.log(err);
  }
});
- Open your chatbot at dialogflow.cloud.google.com
- Test it in the upper right corner: “Hello” > “Lookup a dog name.” > A dog’s name
- OK, back to glitch
- Open the Terminal using the “Tools ^” button and then the “Terminal” button
- Type
lsfor list files and hit enter. See the file there? - Type
cat searches.csvand hit enter. See the log? - “X” out of the Terminal
- To save the file to your own computer …
- Click “Tools ^ “ > “Import and Export”
- Scroll this window
- Click “Download project”
- This will save a zip file to your downloads folder
- Go open it
- Look for
searches.csv. This can be read by a spreadsheet program like Google Sheets
Class 9 • Identifying and communicating your hopes and dreams
- Pitch it to the people who would help you make it
-
Get them interested in the purpose and impact
- You have the expierience to know how the internet works
- You’ve seen examples here and elsewhere
-
Think about a project you’d like to see happen. For real.
- Worksheet / checklist … for homework and the future
Class 10 • Make bots to do your bidding
- Every time a famous person tweets, put it in a spreadsheet
- Every time it’s at or below 32 degrees send a tweet
- Whenever someone posts on their blog, get an email
- Whenever papers are filed in a court case, get an email
- When something happens in the digital world, make something happen in the physical world
We did a review of IFTTT, Zapier, Google Alerts, and Klaxon to help you monitor the internet and collect data.
Links
Assignment
- Create a new applet/bot using IFTTT (at https://ifttt.com)
- Go to the applet’s “settings”
- Take a screenshot of the area where I can see both the trigger and the action.
- Submit that screenshot using the Google Classroom assignment page.
Class 11 • APIs, scraping and other data sources
You’ve made an API!
https://newmark-bark.glitch.me/name/juno
Note that this is the endpoint for our names API:
https://newmark-bark.glitch.me/name/
And this is our “first 10” endpoint:
https://newmark-bark.glitch.me/first10/
Using an API: Coinbase API + Google Spreadsheet
- Going to use coinbase.com
- The data we want is at this endpoint: https://api.coinbase.com/v2/prices/BTC-USD/spot
- API info is: http://api.coinbase.com
Let’s load this into a Google Spreadsheet, just because we can.
Steps:
- Open a new Google spreadsheet:
sheets.new - Name it “My Coinbase Sheet”
- Go to Tools -> Script Editor
- Name it “Fetch Coinbase Data”
- Copy and paste this block of code into the main window:
Block 11-A
function onOpen() {

    // this code runs when the spreadsheet is opened
    var ui = SpreadsheetApp.getUi();
    ui.createMenu('API')
      .addItem('Update Bitcoin','callCoinbase')
      .addToUi();

}

function callCoinbase() {

    // Call coinbase for the latest data
    var response = UrlFetchApp.fetch("https://api.coinbase.com/v2/prices/BTC-USD/spot");

    var coinbase = JSON.parse(response.getContentText());
    var sheet = SpreadsheetApp.getActiveSheet();

    sheet.getRange(1,1).setValue([coinbase.data.amount]);

}
Let’s review the code.
Then …
- Save
- Run
- Authorize
- Go back to the spreadsheet
- There’s a new item in the menu bar: “API”
- Use “API” > “Update Bitcoin”
More code snippets:
Add the currency value … by adding this line inside the callCoinbase function:
sheet.getRange(1,2).setValue([coinbase.data.currency]);
Add the timestamp!
sheet.getRange(1,3).setValue(Date());
Make it append to the end of the list … (calculate the “row” as the last row plus 1) … by replacing the current sheet.getRange... lines with these three:
var new_row = sheet.getLastRow() + 1;
sheet.getRange(new_row, 1).setValue([coinbase.data.amount]);
sheet.getRange(new_row, 2).setValue([coinbase.data.currency]);
sheet.getRange(new_row, 3).setValue(Date());
Extra info
- Many more great google dashboard examples
- Also good dashboard info.
- Which is also available at another site.
- Note we added in
JSON.parse(data)to those examples
A custom earthquake page using USGS data
- Here’s the origin video
- USGS data home page
- USGS GeoJSON feeds
- Here’s the site I made converting magnitude-moment scale to Meiers
Scraping-but-not-scraping
- Sometimes the data is there in a json file or via an api, under the hood
- Let’s look at the CDC’s Covid Data Page
Actual Scraping:
Drawn from a Medium post by Julia Kho.
Hop over to this Python notebook on Google Colab.
More exploration
- Great walk-through, using the weather service as an example.
Assignment
Check out Google Classroom for the “11 Assignment.” Look for an API you want to use and fill out the form linked in that assignment.
Notes for subsequent classes will be posted prior to the class itself.